By REESE AMOROSI
Here in the Mid-Atlantic region of the United States (Zone 7b) we have four distinct seasons of weather, and each offers a wealth of culinary options for kitchen gardeners. Onion chives – and particularly their blossoms – are one of my spring essentials; they are among the earliest edible perennials to grace our table every year. In this article you will learn how to grow, harvest and divide chives.
Growing Chives
Onion chives (Allium schoenoprasum), a member of the allium family, are very easy to grow from seed. Start them indoors 6-8 weeks before last frost by planting 1/4 deep in seed starting mix. Once your frost date passes, transplant them into the garden in a location with full sun to part sun. You can also direct sow the seeds in the spring once soil temps reach 60-70 degrees. Rich, fertile soil is recommended, but chives aren’t fussy and usually grow where they are planted, within reason. Expect each clump to grow approximately 18-24 inches tall and wide.
To jump ahead a season, chive starts are widely available. OR, if you know someone who grows chives, you may be able to score freebie plants via division (see below).
Harvesting Chives
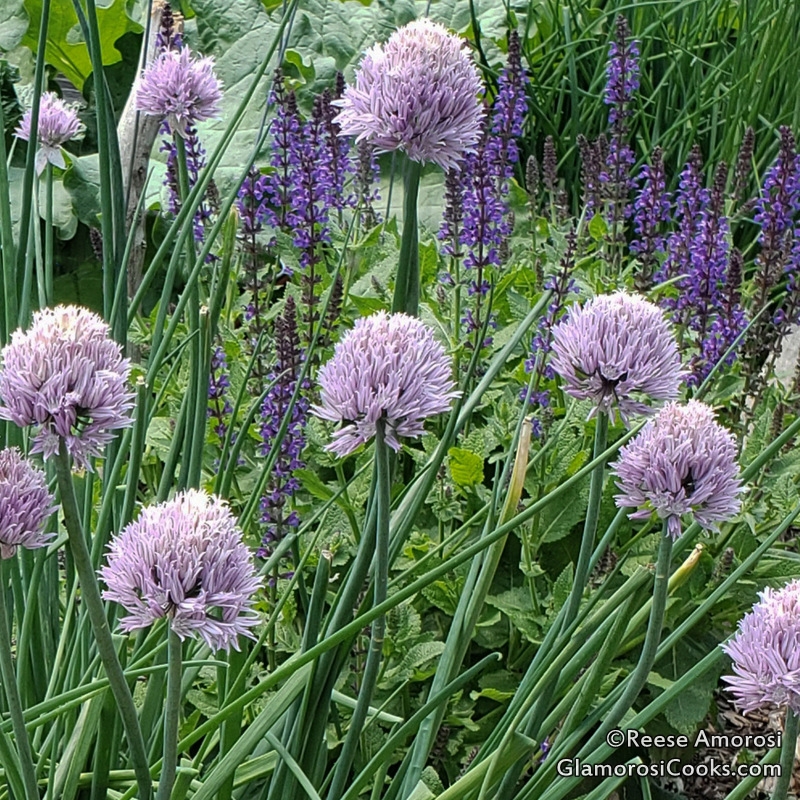
Chive leaves can be harvested the first season, but it usually takes a year for the plant to mature and produce light purple blossoms – my favorite part – in the spring.
- To harvest chive leaves, cut them down to two inches above the soil – this will encourage new growth and provide good air circulation.
- To harvest chive blossoms, which have a stronger onion flavor than the leaves, cut the stem to two inches but only eat the flower (the stem is frequently hard).
Please note that that chive blossoms left on the plant will eventually dry and contain many seeds that germinate easily. Be sure to clip them off if you don’t want them self-seeding throughout your garden. To save the seeds, put the blossoms upside-down in a paper bag and shake them loose. Leave them in the bag for a few days to be sure they are completely dry, then seal them in envelopes with the date marked.
Dividing Chives
Chives form grass-like clumps that grow wider and tighter as time passes, so it is good to divide them every few years (or as needed). Many plants benefit from being split in the spring, but chives thrive when divided in the fall. At the end of the season, cut the chive clumps down to a few inches tall. This encourages new growth, and also makes it easier to work with them. (I also cut them down several times during the growing season because by mid-summer the leaves can get a bit tough. Pruning encourages new growth).
Use a shovel to lift the chives out of the soil – there will be bunches of tiny onion-like bulbs – then break the clump apart by hand or with a trowel. In some cases you’ll just be taking off a section – maybe to share, or to pot them and bring them inside to have fresh chives all winter – or you may decide to divide the entire clump into pieces. It depends on the size of the plant and the project. Bear in mind your chives will be more productive if they aren’t overly crowded below ground.
Chive Tips
- Place chopped chives in ice cube trays and fill with just enough water to cover them. Freeze, then thaw as needed, or add whole cube directly into recipes where the extra bit of water won’t matter (like some soups).
- To grow garlic chives (Allium tuberosum), follow these same procedures outlined for onion chives, but remember that their blooms – white, flat flowers – appear in the fall.
Chive Recipes
Use organically grown chives and blossoms so that you don’t ingest pesticides or other harmful chemicals. Always thoroughly wash all produce before eating. The first three recipes below use chive blossoms and leaves, the vinegar only uses the flowers:
- Chive Blossom Butter
- Radish Toast with Chive Blossom Butter
- Chive Blossom Pasta
- Chive Blossom Vinegar
Onions Chives vs. Garlic Chives
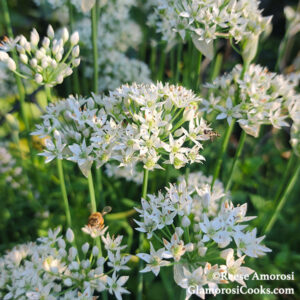 Onion Chives bloom in the spring, but they have an equally delicious counterpart that blooms in the fall: Garlic Chives. The flowers on garlic chives look like a ball of tiny white stars. In our region (Mid-Atlantic, zone 7b) Garlic Chives bloom from late-August through the end of September, sometimes a little longer. Other than blooming in opposite seasons, onion chives and garlic chives are similar in terms of growing, harvesting and dividing them.
There is the expected difference in taste – onion vs garlic – but garlic chive flowers can be used in any of my onion chive flower recipes. You can see garlic chive flowers in action here on this Easy Flatbread Pizza recipe.
*************
If you enjoyed “How to Grow, Harvest and Divide Chives” you may also like “How to Grow Spring Radishes vs. Winter Radishes.”
