This jerky is bananas!
This Banana Jerky – Dehydrator Method recipe transforms the fresh fruit into a chewy, delicious treat perfect snacking on-the-go. It’s also a tasty snack for when you’re just chilling at at home – we can’t get enough of it.
Choosing and preparing the bananas
 When eating bananas fresh I prefer them just barely turning yellow, but for this Banana Jerky – Dehydrator Method recipe they should be fully ripe (but not mushy). Be sure to taste a banana from your bunch before you start the time consuming process of dehydrating. If your bananas don’t taste amazing fresh, they won’t taste amazing dried.
Remove all banana strings or bruised areas, then cut into slices. Depending on your machine, you may need to cut longer bananas in half first so they’ll fit the dehydrator trays. They don’t have to all be exactly the same length, but if you want to measure and cut the ends off of some so your jerky will be more precise, that is nice! It is important that they are all the same thickness so they dry evenly and at the same pace.
For this recipe I used 5 lbs of bananas, which in this case was 15 fruits, and once sliced they all fit on 5 trays in my dehydrator.
Optional step: use a pastry brush to coat the bananas with lemon juice (the finished jerky in the photo above IS coated with lemon). It prevents browning and gives the jerky a little zing. I suggest making this recipe twice so you can try it both ways (or use lemon on half of them in one go-round) to see which way you prefer.
Dehydrating the bananas
When the pandemic hit in 2020, one of my first moves was to buy a food dehydrator. At the time I was concerned about the stability of the food supply chain and I was preparing for a dystopian future I hadn’t thought about since Y2K (old!). Dehydrating food gave me something proactive to do during lockdown, and it’s a practice I’ve continued. Along with canning, it’s part of my ongoing food preservation routine (we are soooo ready for the zombie apocalypse). But, it’s not all about stockpiling – we love snacking on dried fruits and vegetables, and Banana Jerky is one of our favorites.
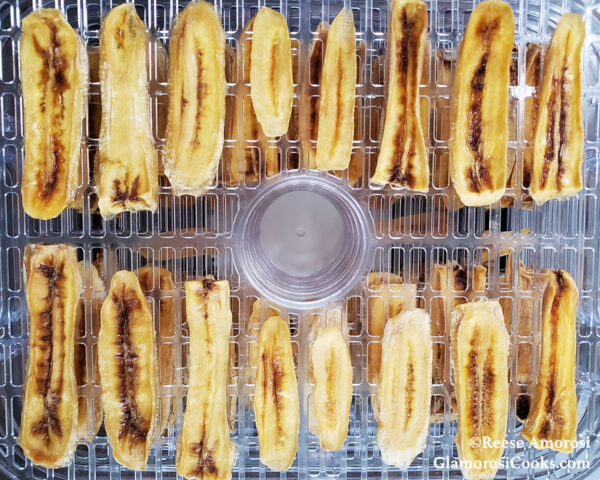
Although I covet an Excalibur dehydrator, I am currently using an inexpensive machine with a limited range of pre-set temperatures. They seemed counter-intuitive at first, but I got used to them and they work. For this Banana Jerky recipe the dehydrator is set to 140 for 8 hours. To promote air circulation, leave space between the bananas. For even drying, pause and rotate the trays every few hours. Also, lift each banana slice with tongs to make sure they’re not sticking.
Note that when dehydrating bananas they don’t wrinkle or shrink as much as other produce like cherries or aubergine. When the bananas are done drying they should be bendable and slightly tacky, but not wet. As always, there are variables that affect the drying time: the amount of water in the fruit, the weather in your area (temperatures and rain and/or humidity can make the process take longer), etc. Practice makes perfect! Get to know the quirks of your machine and you’ll be able to gauge the temps and timing like a pro.
Conditioning the bananas
Once the dehydrating is complete, allow the bananas to “rest” and cool in the machine for an hour or so, then move them to glass jars. For easy clean up, soak the dehydrator trays right after.
At this point the Banana Jerky is ready to eat and if you’re going to use it quickly you’re good to go. BUT, if you’re planning to store it, you will need to “condition” the jerky. Place it in jars filled only halfway and shake them several times a day. If condensation forms on the glass, the bananas aren’t dry enough and should go back in the dehydrator for an hour or more. Repeat this process daily until no condensation appears, and then the jars can be fully filled and stored. If the conditioning step is skipped and the jerky is too wet, it may mold and be unsafe to eat. All dehydrated foods headed for long-term storage should be conditioned to boost their safety and quality.
Storing Banana Jerky
Banana Jerky should be stored in air-tight containers in a cool, dry location away from light. It can keep for 6-12 months, but there are variables including the pantry temperature, your area’s climate, etc. Monitor all of your dehydrated foods and immediately discard any that look moldy, discolored, etc.
Variations
After you’ve made this recipe my way once or twice, it’s time to start making it your way. You might want to cut the bananas into circles instead of long slices. Maybe you prefer plantain? Another way to add your own spin is to sprinkle a little flavoring before dehydrating. You can’t go wrong with cinnamon, cocoa powder, or one of our favorite over-the-counter spices, Tajín, a chili-lime-sea salt blend
**********
If you like this Banana Jerky recipe, try Tofu Jerky with Peanut Sauce or Dried Strawberries or Dried Cherries

| Prep Time | 15 minutes |
| Cook Time | 8 hours |
| Passive Time | 1 hour |
| Servings |
|
- 5 lb bananas medium
- 2-4 glass jars for conditioning and storage
- 1/2 cup lemon juice optional
Ingredients
|

|
- Remove the banana strings and any bruised areas, then slices the bananas long-ways taking care that they are all the same thickness.
- Arrange the banana slices on the dehydrator tray leaving space between each one to promote air circulation.
- Set the dehydrator at 140 for 8 hours. For even drying, pause the dehydrator every few hours and rotate the trays. Lift each banana slice with tongs to make sure they're not sticking to the tray.
- Once the banana slices are done drying, leave them in the dehydrator to cool before moving them to glass jars.
- Serve within a few days, or condition the banana jerky for long-term pantry storage.


